Pages

Monday, August 1, 2011

A project I did when I was in High School... 0w0

Well one day... actually a couple of days ago.... -__-.... I was rummaging through my 1.5 tb external hard drive when I came across a folder that had all my high school projects in it.... OoO.... And I found something I made actually as an individual project, but when my school was holding a recycled exhibition, I gladly submitted it to be viewed by my fellow schoolmates.... ^^.... I made three dresses out of recycled things I found at my house which are newspapers, colorful plastic bags and garbage bags..... I actually had fun making these.... Oh and I used a pillow as a base for the body so I didn't have to put them on any mannequins.... Here they are !!! => 
  This was the hardest one to make because I had to hand fold each one of the fans and glue a ton of strips of blue tissue papers across the top.... -__-;.... Then the bodice was folded and glued with darts to give it shape.... and if you've noticed it's made with Chinese newspapers because that's the only ones we have lying in our house.... But I picked the spreads that had more color on it.... It was pre-tty heavy after it was finished...T__T
This is the second one I made out of all the colorful bags I found in our house.... It was kinda sad that I had to give up some of my kawaii bags that had my favorite characters on it.... T__T.... but oh wellz... it was for the sake of this project..... I think was more simple and abstract in many ways.... ^^
This was my favorite one..... Not only was it simple, it looked wearable... I used both black and white garbage bags to construct it and for the black fan off to the side.... I used newspaper to make it stiff.... The red belt really tied it together.... donated by my mom from her closet.... ^^.... I think for a high school-er it came out looking pretty good.... What do you think? (^w^)/

Friday, July 29, 2011

This would make Arashi fans go Kyaaaa!!!!! ^w^ V

Well today is FRIDAY!!!!!! YaY!!! \(^o^)/.... So I'm taking a break on my crafts and I decided to upload other stuff I made through the fancy Photo-Shop.... ^^.... Well first off, I have a project I made for Japanese class and this is an Arashi Menu I made for a skit..... It was fun..... ^^.... and my good friend (also an Arashi fan) really liked the menu and kept one and I gave the other one to my Sensei..... so if your curious here it is =>

(-o-) zzZZzzZZZ.... Sigh.... Aren't they the perfect men.... ^^.... Well anyway... If you don't know who Arashi is, their a five men group that sings J-pop from Japan.... They are pretty popular there and they are also the underlings of SMAP.... They can act, sing, dance and host variety shows.... Other than entertainment they have their own interesting hobbies like drawing, fishing, cooking, instrumental playing, and animals.... ^^.... Although people don't understand how they are popular because they are labeled not tall enough and not good looking enough, but I think their individual personalities are pretty strong and their need to make people laugh is very nice combination.... I've been their fan ever since I watched Hana Yori Dango (Jap version) in High School..... And then I found out Arashi was the one who sang the opening.... Then I found a youtube video of all five of them dressed up and doing cheer-leading on I think was G no Arashi or was it D.... don't remember.... But I do remember that Nino was wearing a wig and bald under.... It was sooo funny that I got hooked.... Then I became their fan in an instant..... and I'm still their fan..... I only wish that I can one day go to one of their concerts...... V (^w^) v  

Thursday, July 28, 2011

An easy DIY on how to make a simple Bolero for any occasion!!!! ^v^

Remember the bolero jacket I was wearing for the Punk'D out Night Dress .... ^^... Well here is the tutorial on how you can make your very own ... \(^o^)/ =>
Well the design for this Jacket is very simple, so it's best made with fabrics that already have an interesting design on it. The inspiration for this jacket came when I was sitting in the library at school and I stumbled on a book on Halston, and all the designs he made when he was still the designer were very simple shapes like circles and rectangles all draped and sewn differently to create elegant garments... I really liked the concept and therefore came up with this bolero... ^^... oh and I forgot to mention that it is best made with a drapey fabric like silk, charmeuse, a light satin and knit. Do not use heavy fabrics for this jacket because I will assure you it probably won't work..... m(.\__/.)m..... Well anyway here's the tutorial I'm going to show you through paper since I'm kinda lazy to re-sew everything again....^_^ =>

Here you are to measure how big you want your bolero to be....... Measure from the Center Back to what ever length you want the jacket to be.... Joking..... ^o^
To make it easier for you guys, the measurement is 24 inches by 30 inches.... How much is that in centimeters I really don't know..... -___-.... But I'm sure you can convert that on Google.... ^^... If you want the jacket to be bigger, it's possible, remember the jacket is on a 3:5 ratio.... ^_^
After cutting the rectangle pattern, you fold the paper like this to prepare for the next step which is to......
Create a neckline!!!! To do that you just find how much you want to drop in the Center Back.... for me I think I dropped around 1 inch and I advice NOT to drop more that 1.5 inches. (The drop means the lowest part of the neckline, in this case the middle of the paper) Then I french curved in the neckline and if you don't have a french curve just try to copy how it looks like on top.... ^^ 
Then you cut out the neck part, and Tadaaa.... Your pattern should look exactly like what I have on top... And then you take this and cut the fabric with this pattern...

Next you are to bind all the edges... yes bind....so that you don't leave any raw edges hanging out...if you don't know how to bind I'll show you in the next couple of steps... if you do then you can just skip the next couple of steps.... ^^V
1. Take a strip of fabric of the size you want... like for example, if you want a half inch binding you need to make the strip 2 inches wide.... 1 inch bind would be 4 inches in width for the strip and so on so far.... I think you shouldn't make the binding anymore than a half inch because it would look too wide in my opinion....  oh and make sure the strip is cut on bias..... which is fabric cut diagonally on the fabric.... if you think this is too hard for you, you can just use straight grain and just cut strips along the sides of the fabric.... or you can just us really wide ribbons.... If any of these work for you, it's fine with me.... ^_^
2. Find the middle which is the red.
3. Fold the top and bottom towards the red center.
4. And fold it in half... Tadaa... now you've made a binding strip...^^ v... and all you have to do is to place the design fabric in between the book(referring to the binding because it looks like a book) and sew down the opening.... ^^ 
Now you can bind any side of a fabric with the strip you've made .... and now back to the main tutorial....=>
Now after the binding, your piece should look something like this.... and yes I just took a marker and drew in the binding which I know looks unflattering....-___-.... but now let's go on to the next step.....^^
Now you just fold it and sew down the ends (the big blue x) like this so that your arms can go through the 2 slits on either side and the jacket is finished.... and make sure to really sew down the edge because I'm just marking where to sew with the 2 Xs....  YAY!!!! \(^o^)/... So now you can wear your newly made garment....
whoops.... not intended for plushies, but....
A nice stylish piece that can go over dresses and tops for any occasion.... (^-^)V... You can make this jacket double sided if you want to.... just make sure you neatly bind everything so that none of the raw edges are sticking out.... If you want to pimp out your own version with lace and other embellishments.... of course you can... I mean there really isn't any rules to this.... Have fun making your own versions and if you'd like, I'd like to see the different versions you guys make.... So that's it for today!!! ^W^ 
Oh and any questions you guys have, feel free to leave a comment down below...^^


Wednesday, July 27, 2011

Walkout in the Rain under a Rainbow

I really liked this rainbow colored shawl my cousin gave me a while back and I thought it was a waste for being just a shawl so I turned it into a boat neck blouse. Then I thought it would look cute under some overall type dress in a plain color so I made it to go with the blouse... Well it didn't take long to make them, probably 2 hours for the blouse and a day for the overall-dress. I actually design and make my own clothing which means that I actually make my own patterns... -__-... I think the most hardest part in making a garment is cutting out the pieces because it takes a lot of patience and tons of needle poking to do it right....
But anyway here's the pic!!! =>
 I also made those cute looking shoes out of some left over fabric I had and an old slipper I wore for ages.... but I was happy that it came out looking pro, I mean.... my feet is unusually wide so normal shoes give me a hard time....so I practically gave up wearing shoes unless I feel like putting myself through hell.... ^^... If your wondering about the pom-poms, their not part of the dress, it's just simply my mom's way of taking the outfit and making it more fun.... just for the photo shoot of course... and I thought that the rainbow dotted umbrella  went really well with the color scheme.... so I grabbed it for the photo and made it even more interesting.... Hope you guys like it!!!!!  \ (^o^) /

Tuesday, July 26, 2011

Floral Vintage Lolita Dress

I really liked this floral printed fabric I found in my garage so I decided to turn it into a dress. Then I thought that if my whole entire dress was just floral it would be too much, so I paired it with a gray chiffon that I had laying around and which I had used for a past project. And now I get a perfect combination of some peek-a-boo see through without being too showy of the skin.... Well in this picture my mom actually found that huge bow in her drawer and she said that my legs look too bland without anything and so she added the extra touch with some tied ribbons. What can I do without my stylist like mom..... ^v^

Well the sewing of this dress wasn't that hard until it got to the chiffon part, but all in all it didn't take too long. I really like the outcome of this dress and I think it looks vintage and Lolita at the same time... don't you??

Monday, July 25, 2011

Punk'D out Night Dress

I had a hard time making this red dress because Chiffon/Georgette is a pain to sew... but I kinda like how it came out.... and the bolero jacket was really easy to make... just need a very nice fabric to make up for the simplicity... and I paired it up with some boots to give it a more bold look.... for my hair, I used fake hair accessories to somewhat make my hair look longer without getting expensive hair extensions done.... and tadaa... a cute punk-ish look with some Asian inspiration to spice up the night.... ^^V.... 

This is one of the outfits I made over the beginning of the break, well it's some sort of project to get myself to be more productive and not be bored all the time.... So check back for more outfits I made and if anyone wants a DIY on how I made the bolero, I will gladly show you.... ^w^ 

Tuesday, May 24, 2011

Layette Project!! (^3^)

This was my very first project I had to do for children's wear which is a layette that is made from either 100% organic cotton or recycled clothes. This one I made was from my old shirt that I really liked, but got ruined when someone through in a pair of socks that dyed it blue. I was able to cut the pieces on the spots that didn't have the blue dye and compose this little yellow summer dress for a new born princess.(^^v) The hat and booties were suppose to be a panda design, but I used a lavender with white pajama pants for it. 
Here it is:
I'd like to sell only this dress, but the only downside to it is the buttoning at the bottom. Well the theme was eco friendly so I recycled the buttons from another white shirt instead of putting in new snaps which would have been easier to use for diaper change. But if anyone is interested since summer is coming, please let me know because I haven't decided the price for it yet. ^w^

Wild Denim Project!!!! *(0v0)*

This is a design for my denim project, in which we were all told to design any type of denim pants for any age range. So this is what I came up with based on the trends from whats popular in women's wear. I think the design is really cute and the colors really shows how it's meant for a cool girly girl. I love the print, and I still have lots of it. If anyone wants the print to be used in either bag design, I will gladly do. 
Here are the cute bloomer denim shorts I created:
Unfortunately, I don't think I'm going to sell this because it has drawstrings at the hem which should be replaced with elastic for better movement. Then there is the button that needs to be replaced with snaps if I wanted it to function properly for kids. But anyway, I really like the design and just wanted to share it. (^w^)/

Children's Swimsuit Design!! \(^w^)/

Well here is the swimsuit I did for my final project in children's wear. I think it's pretty cute because my inspiration is that of the retro 50's and everyone liked the red cover-up with the yellow cherries. The original idea was to have a red gingham instead of polka dots, but I couldn't find any red gingham prints on spandex, so I opted on red on white polka dots. The outcome wasn't that bad, and I think it came out pretty well. The cover-up took the least amount of time to make, due to the fact that it's a simple square towel in which I slitted in a certain way to obtain this certain look. After cutting it in a certain way, I just bounded the seams with white seam tape and since I thought it looked kind of bland, I added the yellow cherries to make it extra cute. ^^v
 Here is the outcome of my hard work: 


Isn't it just adorable!!!! As much as I would like to, I've decided not to sell it, but I just wanted to share it. v(^w^)v~ enjoy!!~ 

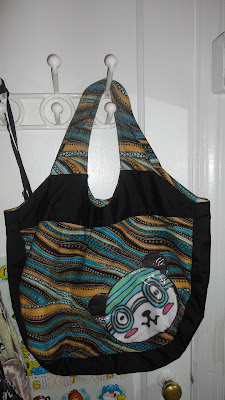
First Bag Design!!!!

This is the first bag I have ever designed and made and I'm quite proud of it. I still have the patterns for this design, so if anyone is interested in a replica, I can make one for you. But if your asking for a panda on it, I probably won't put it on anymore due to the fact that it's simply drawn on fabric with prisma markers and then sewn on top of the fabric is vellum (see through shower curtain). But vellum is pretty hard to deal with, the fumes coming off of it is quite toxic when you try to iron out any creases. Here is the picture of the bag. 
  All in all I'll just sell this bag for around 40-50 dollars, it's quite cute in my opinion and it fits snugly on your shoulders.^^ 

Saturday, May 14, 2011

Little Red Dress for Sale!!!!~

Right now I'm studying Children's wear and for one of our projects, we were required to make a dress for either a 5 year old or 10. I chose to make one for a 5 year old and the outcome was this really colorful, playful dress that many people loved. It was chosen to go on display in school, but got kicked off by the committee because it wasn't one of the things required by some people from somewhere. But anyways, it doesn't matter because why put it on display when it's gonna sit there and collect dust when I can sell it!!!! ^_^... so I decided to sell it through this account... anyone interested can take a look here.
 Well I thought before putting it on display I wanted to see how it looked on a live person, so I put it in the fashion show and you can see it visible in this video... ^^


The little black girl is seven, but i guess she's skinny enough to fit in it, but it's kinda short, so if anyone wants to buy this dress for someone special you can judge how it might fit base on this model. I haven't thought on price yet, but I was thinking about 60-85 dollars plus shipping and handling... If anyone is interested, Please leave a comment below... ^_^V

The Launch Of BuruBeri!!!! ~.*\(^o^)/*.~

Today will be the official launch of BuRu Beri which would be the start to my little hobby of selling bags that I design and make for a small income. Why the name BuRu Beri? That's because my name is Beryl, and when translated into Japanese it becomes beriru which it terms sounds like blue berry. I enjoy making things for personal reasons and being complimented enough by my surrounding friends, I decided to sell the things I make. Here are some examples of the bags I made and feel free to leave a comment.
For now that's all I have.... It's pretty epic fail for a pic, but there's more to come so look forward to them... ^^V...... I'll keep updating..... for how much it may cost.... I was thinking at least 50 dollars..... for the shipping and handling I haven't really thought of it yet because school is still in session and I still have about a week to go before I can really start on planning things..... Estimated time from cutting, to sewing, to packing and shipping, it'll take about 4-6 days...... So thats all for now folks...(^w^)/